CommonLook PDF Validator User Guide
Free PDF checker guide.

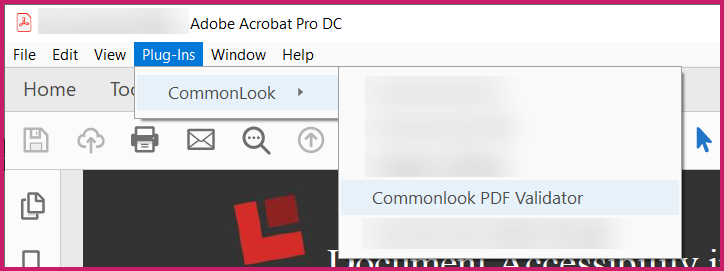
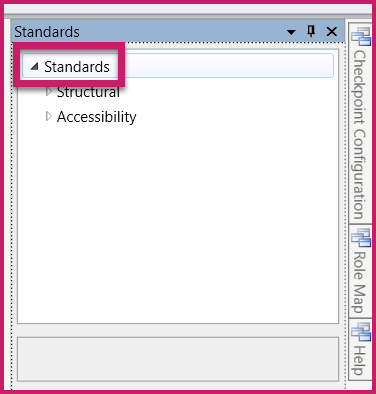
Opening the CommonLook PDF Validator
- Open a PDF in Adobe Acrobat.
- In the toolbar at the top of the Acrobat window, choose Plug-Ins, then CommonLook, and then CommonLook PDF Validator.
- If the document is tagged, the CommonLook PDF Validator will open and allow you to test for compliance (skip to step 3 below).
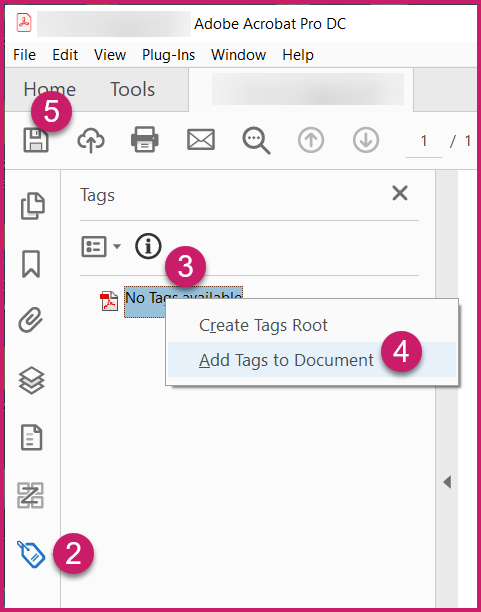
- If the document is not tagged, a message will pop up telling you the document is not tagged and asking you to add tags in Acrobat before using the Validator. Note: To add tags to a PDF, follow these steps:
- Open the untagged PDF.
- Select the Tag icon in the navigation pane (on the left side of the application window). (Or, in the Acrobat toolbar navigate to “View” then “Show/Hide,” then to “Navigation Panes” and select “Tags.”)
- In the Tags panel, right-click/ open the context menu on “No Tags available,”
- Choose “Add Tags to Document,”
- Save.
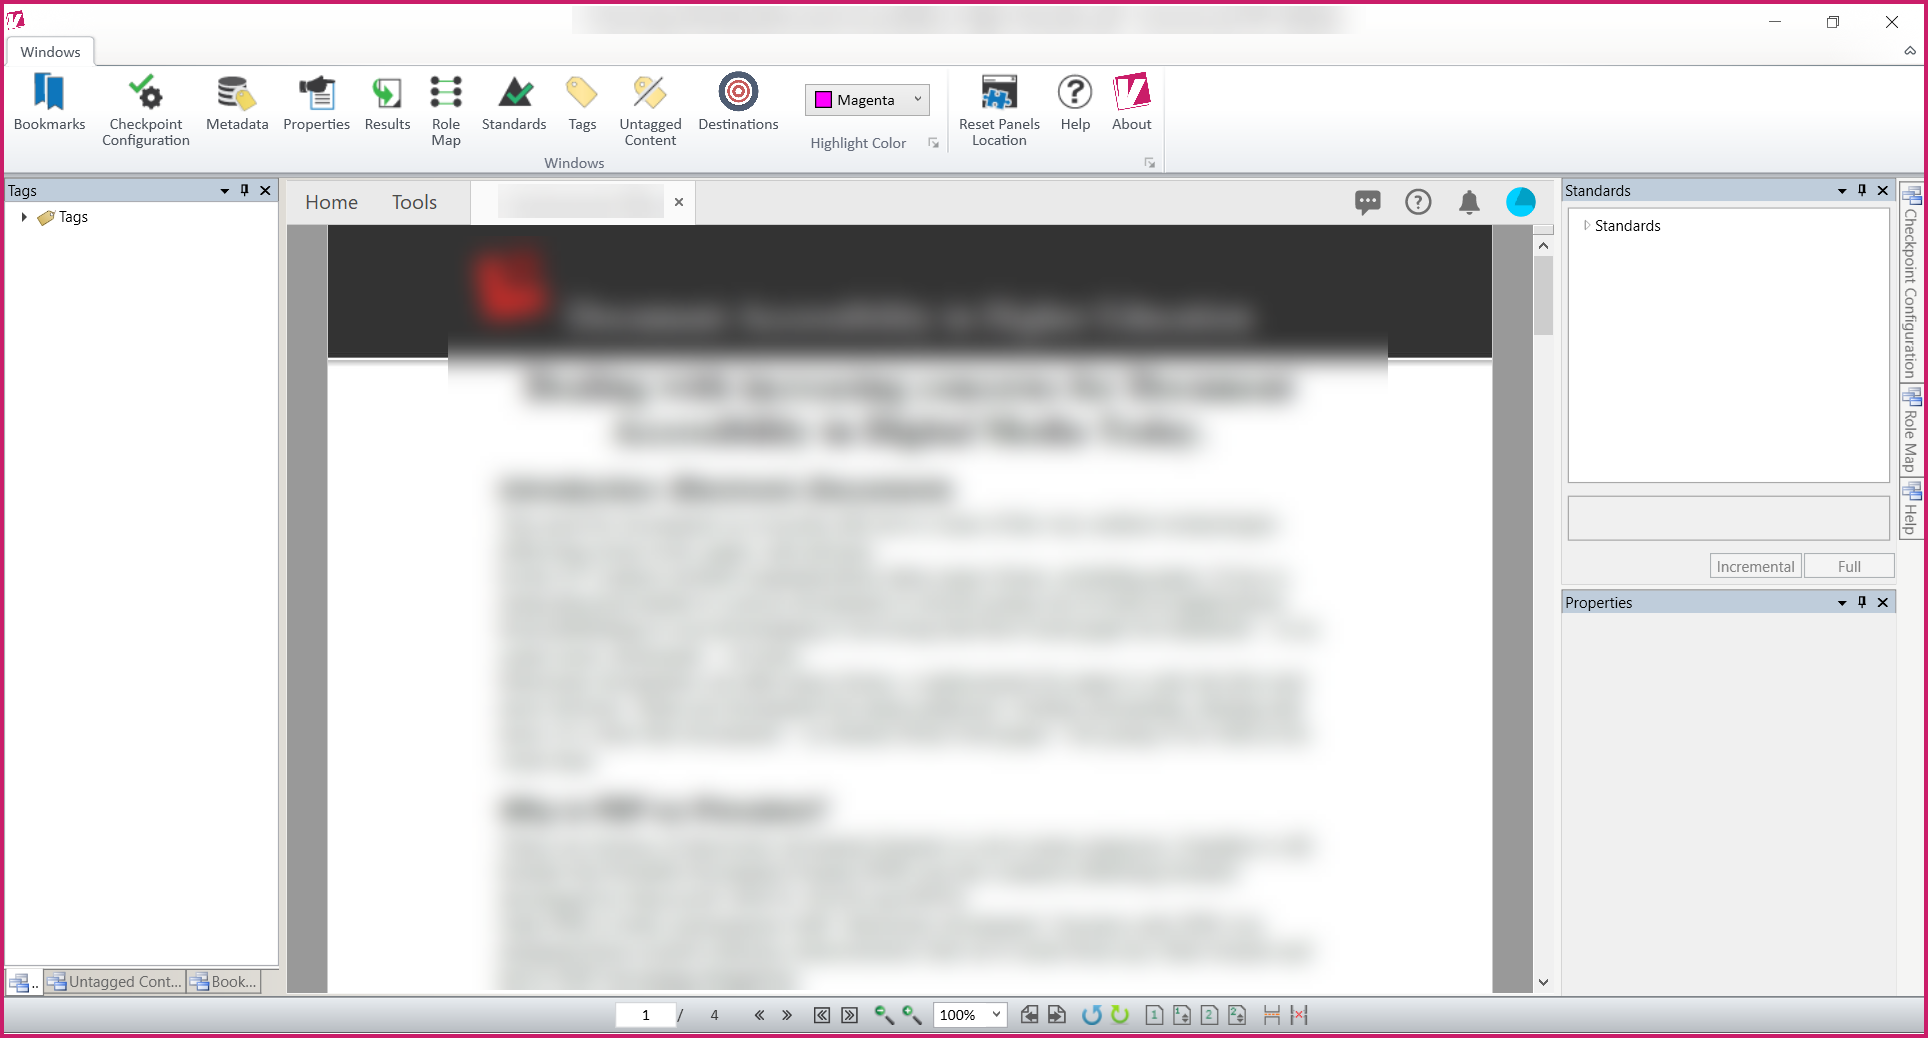
- When the CommonLook Validator opens, the Tags tree will be displayed on the left side of the screen, the Physical View of the document will be displayed in the middle, and the Standards and Properties panels will be shown on the right.
Pro Tip #1: The Checkpoint Configuration panel may be open as well. Unless you’re going to change the checkpoints in the standards that you’re going to test the PDF against, you can close that panel. The easiest way to do that is by navigating to the ribbon of the Windows tab and choosing “Reset Panels Location.”.
Pro Tip #2: Also in the ribbon, you can change your “Highlight Color” to improve the contrast of selected items. Read more in the “Other Buttons in the Ribbon.”
An Important Note About Protected Mode in Acrobat:
Due to a somewhat recent update and new setting in Adobe Acrobat, there is now a potential issue with running the CommonLook PDF Validator.
The Protected Mode feature in Acrobat is still in “Preview” mode (i.e., it is not an officially released feature) and still has some issues which we have been working with Adobe to identify and resolve. In response to these issues, Protected Mode is no longer enabled by default in Acrobat. We expect that Adobe will resolve these issues prior to the official release of Protected Mode.
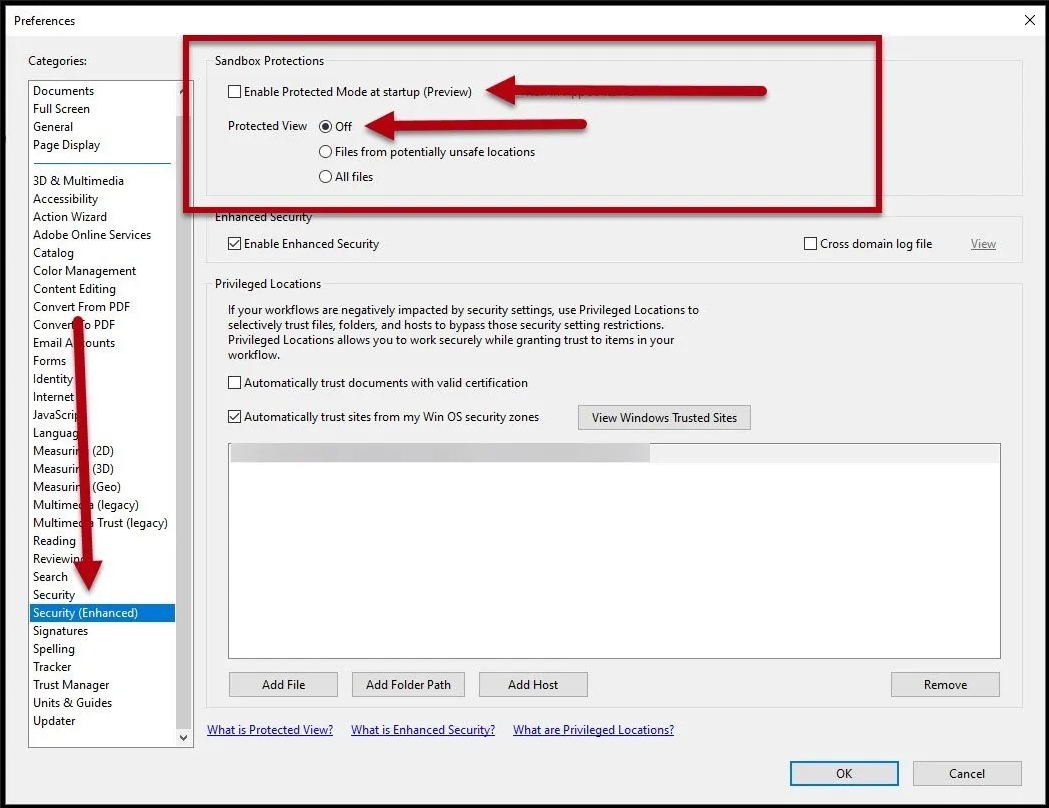
To address this, please turn Protected Mode off by following these steps:
- In Acrobat, navigate to Edit (in the toolbar)
- Choose Preferences
- In the left side of the Preferences dialog box, select Security (Enhanced)
- In the Sandbox Protections, uncheck “Enable Protected Mode at startup”
- In “Protected View,” choose the “Off” radio button. (Please note the screenshot below if needed.)
- If you cannot access Adobe without it crashing please uninstall Both CommonLook PDF and the CommonLook PDF Validator and then use the instructions above to disable the protected mode.
Testing for Compliance
Use the Standards Panel to test a PDF document for compliance with accessibility standards. There are two verifications that can be run on any PDF document: “Structural” and “Accessibility.” Expand the “Standards” menu to open the testing options. (To navigate to the Standards Panel using your keyboard you can use the Alt key to access the buttons on the Windows tab in the toolbar OR Press and hold the Control key and then press the Tab key. This will open the Active Tools Window. Then, use the arrow keys on the keyboard to navigate to Standards and release the Control key. Focus will now be in the Standards Panel.)
Running a “Structural” Check
A “Structural” verification will test the document for things like (but not limited to):
- Proper structure of Lists, Tables, and Table of Contents tags (including “internal” structure elements, like LI, TR, etc., tags, and the proper nesting of those tags),
- Hyperlinks are not broken,
- Tables are “regularly shaped,”
- Tags have been properly nested (not limited to those previously mentioned),
- Empty tags, and
- Empty tags that have alternative text.
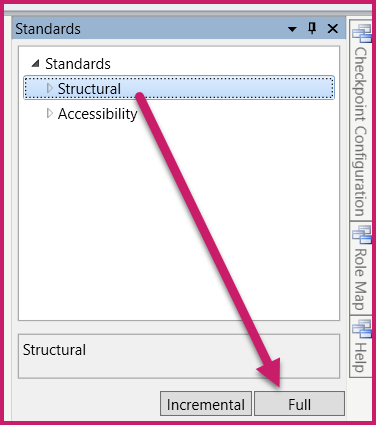
To run a “Structural” check, follow these steps:
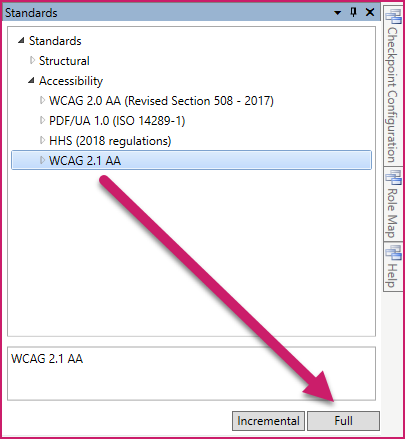
- Choose “Structural” from the list of check options in the <strongStandards panel (optionally, expand “Structural” and choose the actual ISO standard in the menu),
- Navigate to, and select, the “Full verification” button at the lower right corner of the panel.
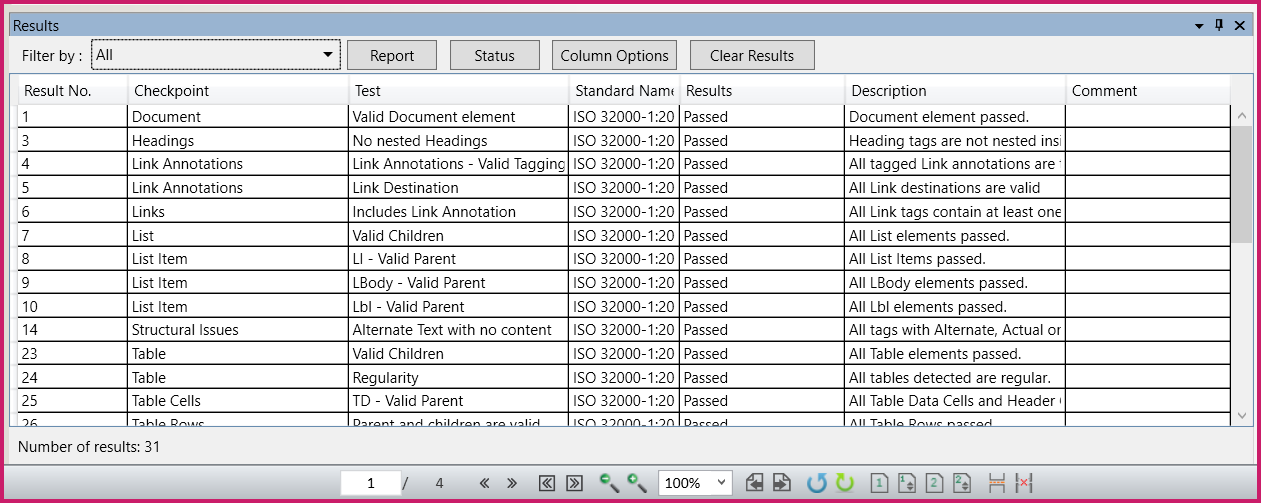
- Below the physical view, the Results panel will open listing all of the checkpoints and their status as relevant to the document. (Using the keyboard, navigate to the Results panel either by pressing the Alt key, accessing the Windows tab in the toolbar, and then navigating to the Results button on the ribbon OR holding down the Control key, pressing Tab, and then, in the Active Tools Window, using the up or down arrows on the keyboard to navigate to Results. When Results is selected, release the Control key.)
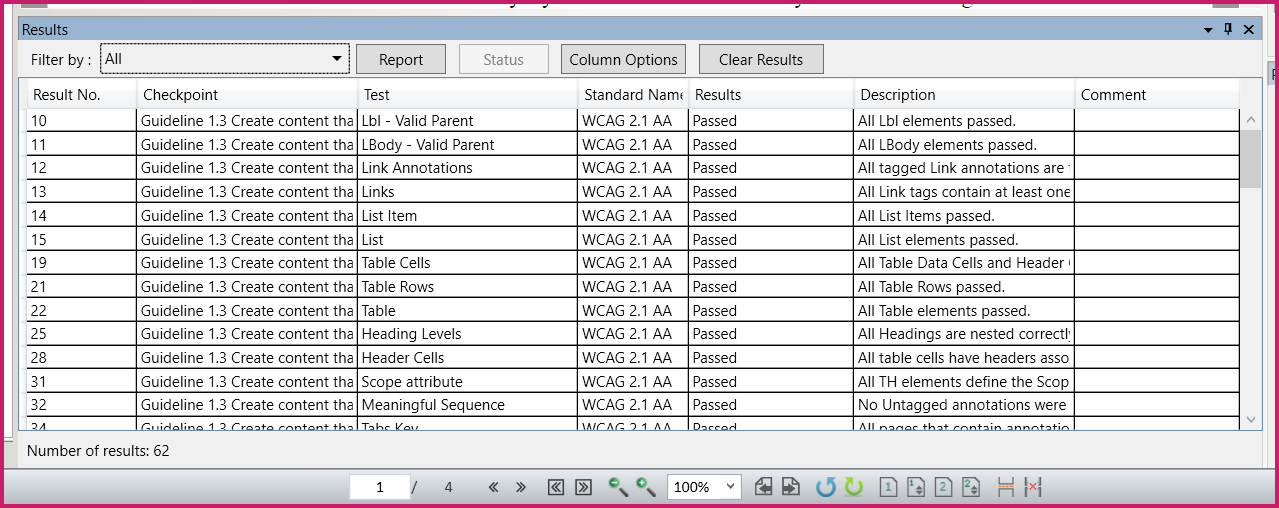
- When the Results panel opens, it’ll list every checkpoint in the selected standard and their testing “status.” There will be a lot of things listed. Don’t worry, CommonLook isn’t necessarily saying you have a lot of failures!
- A checkpoint may be “Passed” if it can be tested automatically and found to be in compliance (for example when a List is correctly assembled). A checkpoint may be “Failed” if automated testing finds an issue in the document (an LBody tag is the immediate child of a List tag). Some checkpoints require manual verification – these will be marked “User Verification.” Other checkpoints may present potential problems (marked as a “Warning”) or might be “Not Applicable.” If you’ve changed your checkpoint configuration, to not test various “things” then some checkpoints (or parts of a checkpoint) may be listed as “Skipped.” In addition, a brief description will be provided for the checkpoint and the test result.
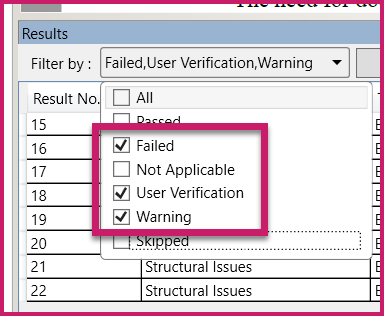
- Near the top left corner of the Results panel is a “Filter by:” drop-down menu. Expand the menu (combo box) and un-check the “All” checkbox. Then, select the checkboxes for “Failed,” “User Verification,” and “Warning.” This will isolate the errors (or potential errors) in the document without having to sort through all of the checkpoints that have passed or are not applicable.
Refer to the section below for information on using the verification results.
Running an “Accessibility” Check
Running an “Accessibility” verification is similar to running a “Structural” test for a document – the difference being that this verification will test the document against one (or more) specific accessibility standards.
To run an “Accessibility” check, follow these steps:
- Navigate to, and expand, the “Accessibility” menu from the list of check options in the Standards panel.
- Select the standard (or standards) that you want to test the document against. (Options include Section 508 from 2001, WCAG 2.0 (Section 508 from 2017, after the Refresh), PDF/UA, HHS (the original standard), HHS 2018 after that standard was also refreshed.Tip: It’s important to expand the “Accessibility” menu and select just the standard(s) that you want to test against. If you simply select “Accessibility,” you’ll end up testing the PDF against all of the standards!
- Navigate to, and select, the “Full validation” button at the lower right corner of the panel.
As when running a “Structural” check, below the physical view, the Results panel will open listing all of the checkpoints and their status as relevant to the document. There will be a lot of things listed. Don’t worry, CommonLook isn’t necessarily saying you have a lot of failures!
A checkpoint may be “Passed” if it can be tested automatically and found to be in compliance (for example if heading levels aren’t skipped). A checkpoint may be “Failed” if automated testing finds an issue in the document (for example, a Figure tag that does not have Alternative text). Some checkpoints require manual verification – these will be marked “User Verification.” An example of this scenario would be the following: If an image in a Figure tag does have Alternative text then this becomes a “User Verification” checkpoint so that the accuracy of the Alternative text can be verified. Other verification results may be listed as “Warnings” (if there are potential problems), checkpoints may be “Not Applicable” in a particular document, or the checkpoint may be “Skipped (based on checkpoint configuration settings).” A brief description will also be provided for each checkpoint and the status.
Near the top left corner of the Results panel is a “Filter by:” drop-down menu.
Expand the menu (combo box) and un-check the “All” checkbox. Then, select the checkboxes for “Failed,” “User Verification,” and “Warning.” This will isolate the errors (or potential errors) in the document without having to sort through all of the checkpoints that have passed and/or are not applicable.
Refer to the section below for information on using the verification results.
What is an “Incremental” Check?
Running an Incremental check will only test the items that have changed since the last validation was run (in the current session). Conducting a Full check will start the validation process over again from the beginning. The benefit of an Incremental check is, when changes have been made to the verification results – for example when changing a checkpoint status from “User Verification” to “Passed” (as discussed below) – these changes are maintained and the checkpoints are not re-tested (requiring re-verification).
Using the Verification Results
Change the status of a checkpoint:
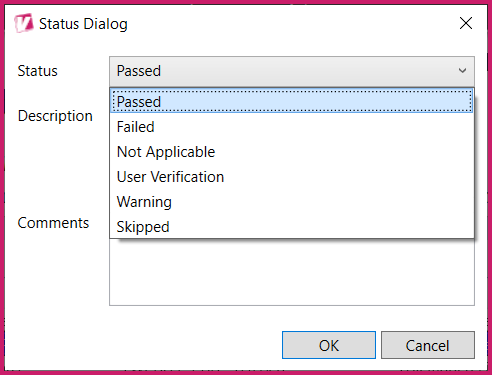
With the CommonLook Validator, you can change the status of a checkpoint, if needed. For example, when the Alternative text for an image has been verified for accuracy, you can change the result from “User Verification” to “Passed.” Similarly, if the Alt text for a Figure tag isn’t correct, you can change the status to “Failed” – indicating in the resulting report that this is something that needs to be fixed. Note: When the status of a checkpoint is manually changed, the comment “Verification result set by user” will be entered in the report to indicate that changes have been made.
- Select an item in the Results panel and then the Status button at the top of the Results panel to show that checkpoint’s Status Dialog window. (Alternatively, select the error in the Results panel and then right-click, or use the keyboard to open the context menu.)

- Choose “Edit checkpoint status.”
- Expand the Status menu in the Status Dialog window to change the checkpoint’s status. Remember, a comment will be automatically added when changing the status. However, if you prefer to enter your own comment, type it into the Comments box at the bottom of the Status Dialog window.
- Navigate to and select OK
Check the Tags
To verify that the correct tags are being used for the content of the document, and to verify that the reading order is correct, follow the steps below. (Reading order requires “User Verification.” To make sure that the reading order is correct, click (or use the down arrow on the keyboard) to move through the tags verifying that the tag’s order follows the logical reading of the document as observed in the physical view.)
An important distinction: In Acrobat, users can view the “Order” panel. However, screen readers do not use this information to determine the reading order for a document. Screen readers will present the content of a document in the order that it appears in the Tags tree. For this reason, it is crucial to verify that the tags are in the correct order!
On the left side of the screen, open the Tags tree by clicking the caret (the arrow) to the left of the “Tags” icon, double-clicking the Tags icon, or navigating to the Tags icon and pressing the right-arrow on your keyboard.
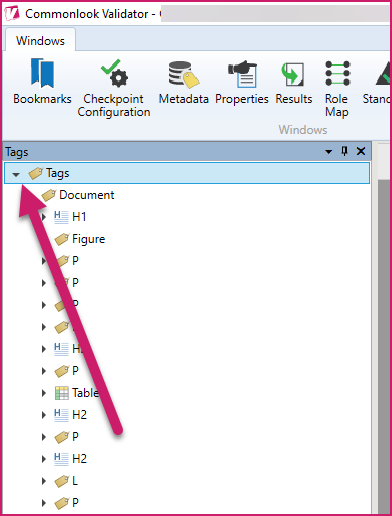
Navigate down through the tags either by clicking on them or using the arrow keys on your keyboard. Use the physical view to verify that:
The correct tag is being used for the content on the page, and
The tags are in the correct reading order.
Tips:
Selecting a tag in the Tags tree will highlight the content in the physical view of the document.
The right-arrow on the keyboard will open a particular tag to show its contents. This is particularly helpful to verify that lists, tables, and tables of contents have been assembled correctly. (The left arrow will close tags.)
Highlighting content in the physical view (drawing a box around it with the mouse) will reveal that content in the Tags tree.
Screen reader users will hear the tag type and then the word “collapsed.” Open the tag (with the right-arrow) to listen to its contents.
View Tag Properties
When a tag (or other element) is selected in the Tags tree, information pertaining to that tag (element) will be displayed in the Properties panel on the lower right side of the screen. (You can also navigate to the Properties panel by choosing the Windows tab in the toolbar and then navigating to Properties, OR, you can hold down the Control key, press the Tab key, and then, in the Active Tools Window, use your up or down arrow key on your keyboard to select Properties.) Use this panel to verify that the information associated with the selected item is correct.
Using the Properties panel, you can verify:
- Tag type,
- The language setting for a particular tag,
- Presence and accuracy of things like:
- Alternative, Actual, and/or Expansion text for images, links, other tags,
- Link Annotation “Contents,”
- Table Summary,
- Tooltips for Form annotations,
- List numbering attributes,
- Other properties depending on the selected tag or element.
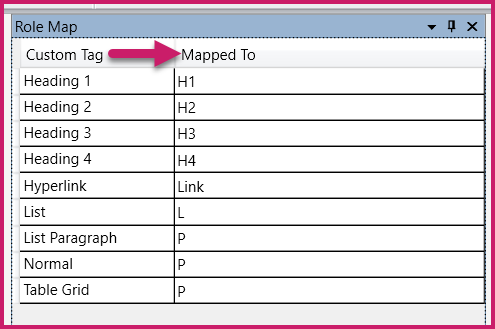
View Role Maps
In general, tagging in a PDF is similar to simple HTML tagging. A “P” tag is used for a paragraph, “L” is used for a list (PDF does not specify ordered or unordered lists), and tables use “TR” for table rows, “TH” for header cells, and “TD” for data cells. Depending on how the document is created, sometimes there will be custom or non-standard tags used. While the use of non-standard tags is allowed, it’s required that these tags be “role mapped” to standard PDF tags.
To verify whether or not custom tags have been correctly role mapped:
Navigate to the Windows tab in the toolbar and then choose the Role Map button in the ribbon. (Alternatively, open the Active Tools Window and choose Role Map.)

When the panel opens, a table will be displayed. The custom tags will be listed in the first column, below the “Custom Tag” column header, and their standard tag equivalent will be listed in the second column, below the “Mapped To” column header. Check to make sure that custom tags are associated with the proper standard tag.
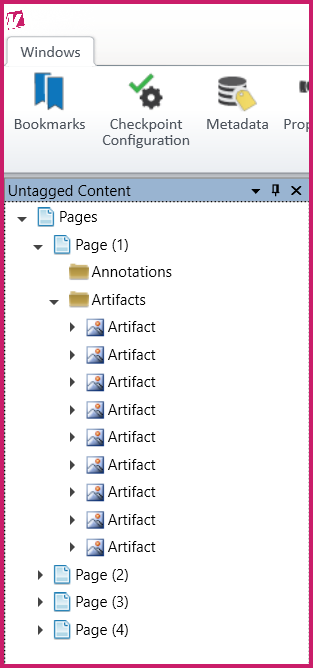
View the Untagged Content
When the “Untagged Content” button is selected in the Windows tab (or from the Active Tools Window, using the Control, Tab, and arrow keys), focus will be placed on the “Untagged Content” panel. Here, organized by page, will be all of the elements in the document that are not tagged. (Untagged elements in a document are also referred to as “artifacts” and should be placed in Artifact containers.)

Expand the contents of a page similarly to how you expanded the Tags tree before, by clicking the caret, double-clicking, or with the arrow keys on your keyboard. Opening a page will reveal the “Annotations” and “Artifacts” folders for that page. Expand those folders (if applicable) to reveal their contents. Tip: In a compliant document, the Annotations folder should be empty because all annotations need to be tagged!
Verify the Tabbing Order
An important component in document accessibility, especially for documents containing links and/or forms, is that the tabbing order follows the document structure. (The document structure is determined by the order of the tags in the Tags tree).
When running a verification, if the tab order isn’t set to follow the document’s structure, you’ll get a failure for that checkpoint. Another way to check the tab order is by following these steps below:
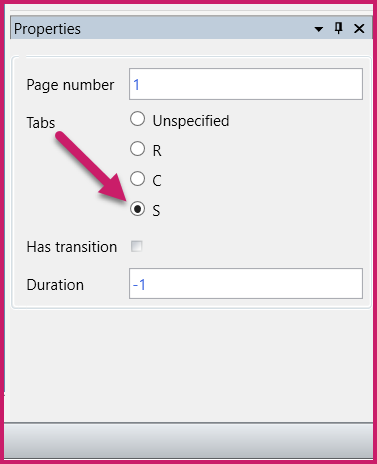
- Open the Untagged Content panel,
- Choose a Page (or pages). (Do not open the page’s contents, simply select the page itself)
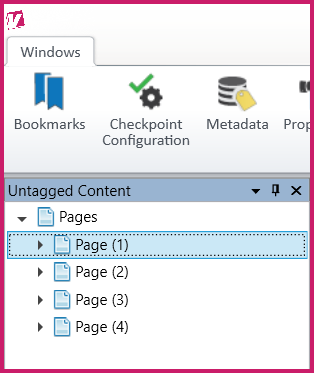
- In the Properties panel, verify the tabbing order (marked as “Tabs” in the panel) is set to follow the document’s structure (the “S” radio button should be selected).
Verify Bookmarks
Screen readers can use headings to navigate through a document similar to how some people use bookmarks. For this reason, it’s ideal to have the bookmarks and the heading levels match. When running a verification, depending on the standard selected, if the headings and bookmarks don’t match, you’ll get a Warning.
You can also check the bookmarks by following these steps:
- Navigate to the Windows tab in the toolbar and select the Bookmarks button (the first icon on the left) to open the bookmarks panel. (Or use the Active Tools Window and arrow keys to navigate to Bookmarks.)

- Expand the bookmarks like you expanded the Tags and Untagged Content. (If there aren’t any bookmarks, the “bookmark root” won’t expand.)
- Navigate through the bookmarks, just like you did through the tags, to verify their accuracy.
Keep in mind that not all documents are required to have bookmarks; this criterion is determined in part by the length of the document and the standard selected during the verification phase.
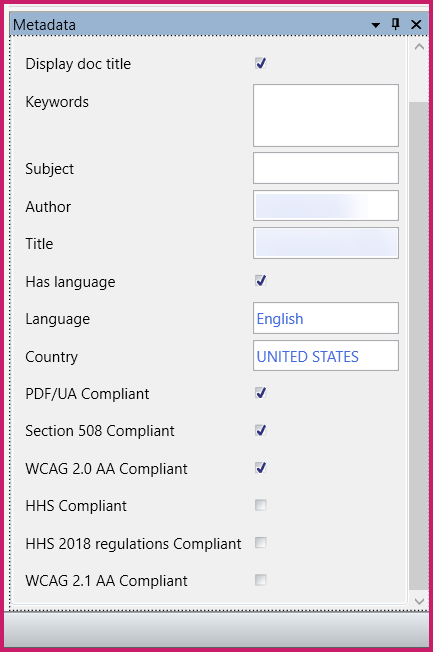
Verify Metadata
In the ribbon on the Windows tab, click the third button from the left to open the Metadata panel at the lower right side of the user interface. (Or, use the Active Tools Window pane, and your arrow keys, to get to the Metadata panel.)

Here, you can verify:
- The presence and accuracy of the document title and that it will be displayed (as opposed to the file name),
- Keywords (separated by semi-colon),
- Subject,
- Author (the author should be the name of the organization, department, division, etc. who created the document – not a specific person’s name),
- The language and the Country are appropriate for the document (as a whole). Note: Sometimes a document will use more than one language. The language for the document as a whole is set here. For portions of a document that need to be read in a different language, make sure that those sections are tagged appropriately and the correct language is assigned to those specific tags (or that section, etc).
- Whether or not the PDF has been marked as compliant with PDF/UA or other standards.
Other Buttons in the Ribbon
Reset Panels Location
Throughout the course of verifying a document, it’s possible to open, close, and move around the various panels that are mentioned in this guide. In addition, when finishing work on one PDF, closing it, and then opening another document for verification, whatever panels were previously open will be open when the software is re-launched. Selecting “Reset Panels Location” provides a quick and easy way to return to the “default” view of the user interface. Tip: This is also helpful for quickly hiding the Checkpoint Configuration panel when first opening the CommonLook PDF Validator.

Help
Use the Help button in the Windows tab to open this User’s Guide.

About
Select the About button in the Windows tab to display version and copyright information as well as to access a link to the CommonLook PDF document remediation software.

Highlight Color

When selections are made, either by highlighting in the physical view or by choosing elements in the Tags or the Untagged Content, whatever is chosen will be outlined in a box (or boxes) in the physical view. Use the Highlight Color drop-down menu to choose a highlight color other than the default. This can be very helpful to increase the contrast and to make your selected content easier to identify.
Generating a Compliance Report
The CommonLook PDF Validator is a powerful tool to assess whether or not PDF files are compliant. After a document has been checked, whether any changes (such as to the status of various checkpoints) have been made or not, it may be very helpful to also generate a report attesting to the document’s accessibility (or lack thereof).
Follow the steps below to generate a report for a particular document. (Note: The report will be created as an HTML file (not PDF) so that it is easily accessible and compliant, eliminating the need to check the report itself for accessibility!)
Run a “Structural” and/ or “Accessibility” check as outlined in those sections above. <strong”>Recommendation: Choose the Structural check and one or more accessibility standards at the same time. This way, one report will have the testing results for both! Use the Control Key on your keyboard to multi-select items in the Standards panel.
Go to the section on running a “Structural” check
Go to the section on running an “Accessibility” check
Change the filter settings, if needed, to include only the results that you want in your report. For example, if you want to report on all statuses then check the “All” checkbox. If, however, you only want to report on Failures, User Verification items, and Warnings, select only those checkboxes from the menu.
Select the “Report” button immediately to the right of the “Filter by” drop-down menu.
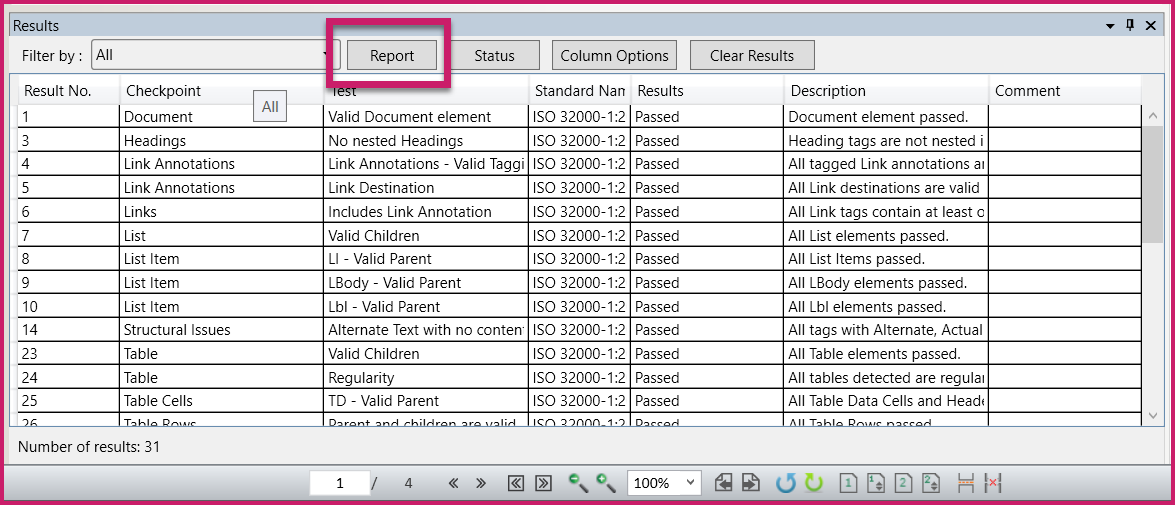
A dialog box to save the report will open. By default, the report will be saved in the same location where the PDF is and the report’s file name will be the same as the PDF. Make any necessary changes and then choose Savethe report was saved and open it to read the report.
After all of the verifications have been run and reports have been generated, if the document is found not to be in compliance, it needs to be fixed.
Please refer to the section below on Making a Document Compliant
Advanced Tools
Checkpoint Configurations

Creating a New Checkpoint Configuration
Some users may wish to create custom checkpoint configurations, for example turning on or off various checkpoints and/or their components, to meet specific organizational needs. (Note: This is to create a new configuration of how a particular standard is tested – it is not to create a new standard.)
Follow these steps to create a new checkpoint configuration:
- Navigate to the Checkpoint Configuration panel either with the button in the Windows tab (the second button from the left) or with the Active Tools Window panel.
- In the Checkpoint Configuration panel, choose “Create.”
- Name the new checkpoint configuration.
- Select the standard upon which to base your new configuration. (In the screenshot below, WCAG 2.1 has been selected.)
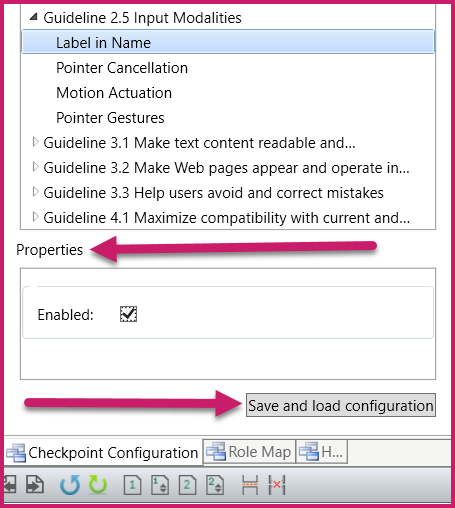
- Select the Checkpoints, Guidelines, Criteria, etc. to edit for your new configuration.
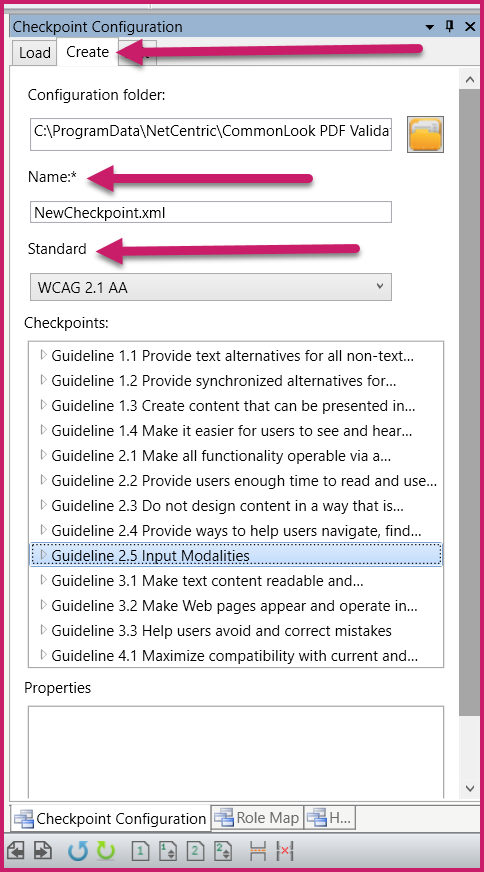
- Select the guideline’s Properties to enable, disable, or otherwise change as needed.
- Select “Save and load configuration.”
- Run the verification as outlined in the sections on running checks, above. (Note: If your new checkpoint configuration is based on the “Structural” standards then you’ll need to run a “Structural” check. If you chose one of the compliance standards, WCAG for example, then run an “Accessibility” check. (Remember the Recommendation in the Reporting section to run both tests at once!)
Editing the Existing Checkpoint Configurations
Aside from creating a new checkpoint configuration, it is possible to edit the existing checkpoint configurations.
Important:If you’re not careful, editing the checkpoint configuration can create some issues when trying to run the software. Proceed through these steps with caution! (It may be safer to create a custom configuration instead, as described in the previous section.)
- Navigate to the Checkpoint Configuration panel either with the button in the Windows tab (the second button from the left) or with the Active Tools Window pane.
- In the Checkpoint Configuration panel, choose “Edit.”
- From the “Existing configuration” drop-down, choose “Configuration.xml.”
- Choose the Standard from the dropdown below. This will be the framework from which edits will be made.
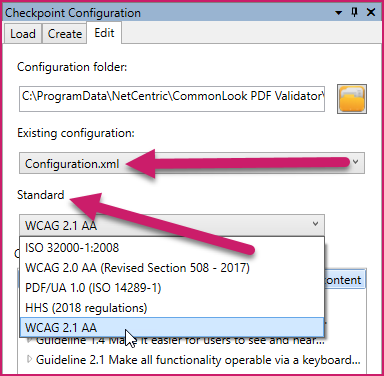
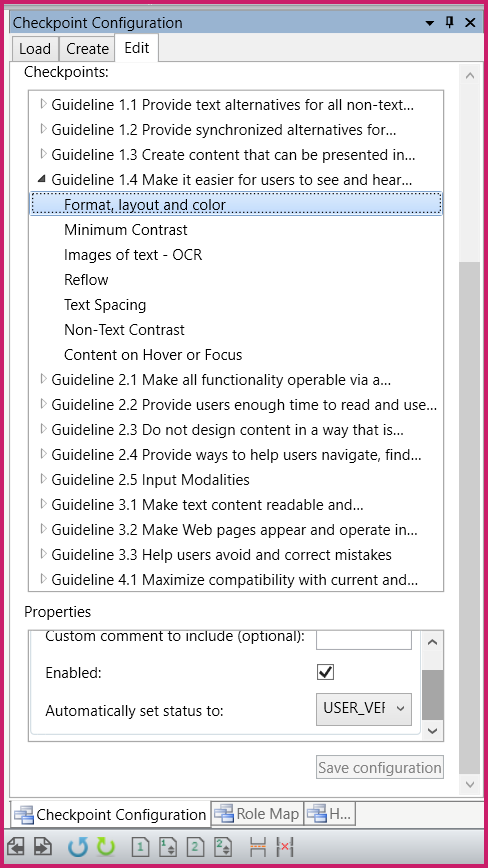
- Next, choose the particular checkpoints within the chosen standard. In the screenshot below, the WCAG 2.1 Standard has been chosen, Guideline 1.4 has been opened, Format, layout and color has been selected, and, in the Properties window for that checkpoint, the user can change the settings.
- When finished making changes, choose “Save configuration.”
- Run a verification according to the steps outlined above in the Testing for Compliance section of this User’s Guide.
Named Destinations

What Are Named Destinations?
A “Named Destination” can be a target for a bookmark or a link referring to a page in a PDF. (Additionally, properties can be set for how that page is to be displayed for example with X, Y, and Z for the X and Y axes and then Z for zoom level.
Why are Named Destinations Used?
Named Destinations provide means for referring to explicit destinations indirectly. Just like an explicit destination can be a target for a link annotation or a bookmark, a Named Destination can be another “place” that a link can take you to in a PDF.
As a result, using Named Destinations makes it easier to implement and/or edit multiple links in a document going to the same place.
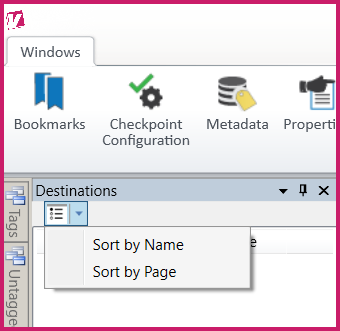
Select the Named Destinations button in the ribbon to open the Named Destinations panel. The Named Destinations in the document will be listed there.
Sorting the Named Destinations for Viewing
In the combo box at the top of the Named Destinations panel, there’s a button that, when selected, opens a menu where you can sort the Named Destinations by Name or Page.
Using/ Verifying Named Destinations
- Select a Named Destination in the list.
- In the Properties panel, you’ll find the Name, Fit Type, and “location” information – Page number, Left (X coordinate), Top (Y coordinate), and Zoom level.
- Right-clicking on a Named Destination (or otherwise opening its context menu) and selecting “Go to Destination” will allow you to go to that destination (the page and location on the page that the Named Destination is pointed to).
- Follow this link for more information about Named Destinations. (Note: The content on this page includes information specific to CommonLook PDF regarding creating, editing, and deleting Named Destinations. This functionality is not available in the CommonLook Validator.)
Making a Document Compliant
Once a document has been tested using the CommonLook PDF Validator, it may be necessary to fix some issues to bring it into compliance.
For this task, we highly recommend using CommonLook PDF.
